Sunday, November 25, 2012

Easy Street Mystery Quilt Part I - Let the Games Begin...


Yep, I've signed up once again for Bonnie K. Hunter's annual Mystery Quilt FUN - this year's mystery has garnered the name, "Easy Street".  According to Bonnie, this Easy Street Mystery Quilt is supposed to be a little 'easier' than past mystery quilts, we'll soon see ;-).  Here's the fabrics I've gathered so far, most are hand-dyed batiks with a few moda black on whites for good measure:

Purples, turquoises, apple greens, and black on white

Batik GRAY constant with more black on white prints  

Last year was my first year to join in ALL the mystery quilt fun.  While my own Orca Bay Mystery quilt is still waiting in the wings for it's final assembly, (hopefully after the holidays when my Quilting Studio should FINALLY be finished complete w/design wall for block placement and assimilation), this one will be a great stress buster for me during the holidays and completed just in time to join Orca Bay for assembly and completion in the New Year.

Here's progress so far:

Cutting the 2" 'twosie' sub-cuts

Gaining some ground on the needed 384 twosie sub-cuts ;-)

All 2" twosie sub-cut units pinned together and ready to be stitched

Sewing the 2" twosie sub-cuts into 4-patch units

Half of the 4-patch units all sewn together complete w/center seam 'spin'

Alrighty then, time to get back to it and finish up the second half of the 4-patch units prior to the Monday morning 'linky'...

UPDATE 11/26/2012:  after hemming 2 pairs of jeans for the DGD, finished up the second half of the 4-patch units just in time for Monday morning 'linky' over at Bonnie Hunter's Quiltville...

Stacks of (10) 4-patch units - one stack has (20) on the lower right-hand corner, 
and one BIG stack of (100), upper right-hand corner. 

And here they are - ALL (192) 4-patch units!  
Actually, there are (199) 4-patch units since I ended up w/a few extras ;-)

They've all been stored away in a festive holiday Rubbermaid container, labeled w/painter's tape, ready and waiting to be called up.


Later,
~Deb

NOTE: to view all the other participants in the 'Easy Street Mystery Quilt' and their progress, go to Bonnie Hunter's Mystery Monday Link Up for 11/26/2012 here:  http://quiltville.blogspot.com/2012/11/easy-street-monday-link-up-1.html 


Monday, November 12, 2012

Hurricane Sandy Quilt #1 underway w/Updates...

After finishing up the Heart Quilt yesterday afternoon - it's bound and gently laundered, waiting for the youngest daughter to make the final decision on which quilt label to use since it's her gift for a friend's daughter's birthday.  So, while waiting for that outcome ;-), I had some time to make final decisions on which quilt I would make first for the Hurricane Sandy Quilt Relief project.  I decided on this one from the Jelly Roll Quilts book by Pam & Nicky Lintott:


 The Bars of Gold quilt pattern is a favorite of mine which uses 2 1/2" fabric strips for the 'bars' and can be adaptable to whatever quilt size you want to make by changing the size of the interior border sashings and outside borders.  I'm enlarging my quilt to be a double bed size - it's a nice size and works well for children & teens. It sews up quickly, the color options are unlimited including scrappy, and it's gorgeous in red/white & blue, and jelly rolls work extremely well since they're pre-cuts, and my ultimate requirement - it's FUN to sew!

I was able to gather up some of the fabrics including a gorgeous hand-dyed candy apple green/yellow/turquoise/pink/purple batik and some Good Morning fabrics by Moda - so playful and colorful:

Border and Sashing fabrics - I'm adding an additional outside purple border to enlarge the quilt and tie it all together, and the green batik will be used for the interior sashings and border

Bar strip fabrics from Good Morning jelly roll by Moda      .

And they are sewing up wonderfully well:

First bar strips sewn together - and we're off to the races!

You can probably tell, this is going to be another 'girl' quilt ;-).  I will also be making a black & white w/jungle green gold bar quilt (got the jungle green fabric on sale over at equilter.com, they're having some really great pre-holiday sales right now), which will be more non-gender, I'm thinking for the parents maybe, or older teen, even a guy.  And the third quilt I haven't made a final decision on yet, possibly a rail fence, which also works well w/scraps and jelly rolls maybe in some nice, warm fall colors, maybe some flannel fabrics, still pondering...

UPDATE 11/26/2012: after taking time out to get my blocks all put together and stowed away for Bonnie K. Hunter's annual mystery quilt - this year it's the Easy Street Mystery Quilt , I was able to get back to putting this cute quilt altogether.  With a Thanksgiving, a death of a friend's father, and family all walking around, been too difficult to try and lay it out in front of the Christmas Tree, my current design area, (remember, my 'real' design wall is still waiting to be built and put up in the new Quilting Studio which is still waiting to be finished...but I digress...again...sorry ;-), and I'm running way behind my original schedule of having this quilt completed and shipped 'prior' to Thanksgiving, going to have to 'step things up a bit' for the next few days to get caught up.  So here's the finished quilt top, The Good Morning Quilt...drumroll Please...Tah Dah:

I know, I know, the block looks off-center but actually - it's intentional to accommodate a quilting design motif - NO worries!  Don't you just love the limey green/lemon yellow/hot pink batik borders...yummy ;-)

It turned out great I think and just a wee bit bigger than I anticipated 
since I changed the sizes of those borders but it will be a great size for a teen, don't you think?

Good Morning moda strip blocks/bars with green batik borders

Outside moda Good Morning purple flower power borders

And what Good Morning quilt would be complete without a Good Night block?

And now, we're off to load onto the Betty Boop quilting machine - Betty's been a little lonely for the past couple of weeks since we finished the Girly Heart quilt so, time to get her busy quilting...

OK, back to the FUN!
~Deb

UPDATE 3/6/2013: to see how this one quilted out, check out 'Quilting the Good Morning Quilt'

Sunday, November 11, 2012

Thank a VET...

Today as we observe our national Veteran's Day in honor of those whom have served our country to protect us and those who couldn't protect themselves throughout our world, Please take a moment - just one little moment in time to Thank those Veteran's of the past, present, and future for their service and sacrifice.


Here is a hearty shout out and Thank YOU to ALL our Veterans...


We Love YOU!

~Deb

PS...Special Thanks to 8th grade Social Studies Teacher - Mr. Brown, for graciously allowing us to use his video on our site ;-)

Thursday, November 8, 2012

Girly 'Heart' Quilt

After finishing up the 10th male-themed quilt, I was more than ready for a 'girly' quilt and I knew I had the perfect one.  This appliqued heart quilt was started several months ago as a gift and I was finally able to get back to it last week and finish it up in between quilting and hammering...


I'm doing 'McTavishing' (what else?) in the outside borders, w/random stippling in the cloud areas in the border and interior background around the appliqued hearts, ruler work in the green sashing borders, and I haven't decided what will be in the pink owl border, just know I'll be using Rainbows Strawberry to do it.

My ruler work is improving - FINALLY, and I'm actually starting to enjoy doing it - YEAH!

I just received some new workshop DVD's from Jamie Wallen, and after watching just a bit of his feathering in the Mystical CottonTracks Workshop I, I think I may finally have a shot at executing some decent feathers.  In fact, I'm auditioning one aspect for the pink border in this quilt, and I believe it may work quite well.  We'll see after I do some more practicing ;-)

UPDATE 11/10/12: after watching more of Jamie Wallen's workshop DVDs, went for a combination of freehand swirly heart paisleys and I think they were just the ticket:


I wasn't too sure about this design until it was quilted - now everyone says it 'makes' the quilt!


Back of the flannel back w/quilting - I will be using more flannel, LOVE how the stitches sink into the flannel

Coming off the frame - ready for binding!

In the meantime, need to get back to my stippling, love to stipple in manual mode, makes the stippling go FAST ;-)

Later,
~Deb

Wednesday, November 7, 2012

Wavy and/or Uneven Borders - What To Do?


 Awhile back I promised I would discuss how I handle wavy and/or uneven borders.  First things first.  I do EVERYTHING in my power to avoid having wavy and/or uneven borders in the first place during construction of my quilt top because they are a bear to quilt on any machine, especially a longarm.  Here are a few things that can be done to ensure ALL borders are the same size without going to alot of extra time and effort - my border shortcuts, if you will ;-)

Border Construction Shortcuts

  • Utilize the law of averages, i.e., once the quilt top interior has been completely constructed, pressed and ready for external borders, take 3 measurements - one across the top edge-to-edge, one across the center of the quilt top E2E, and the final measurement across the bottom of the quilt top E2E.  Add ALL the resulting totals together and divide the sum by 3 (total number of measurements taken).  Example:  top measurement = 100", center measurement = 101", bottom measurement = 102", so 100" + 101" + 102" = 303" divided by 3 = 101", and that's the measurement you use to cut your top and bottom borders.  Do the same for the side borders AFTER you have attached the top and bottom borders or vice/versa, if you attach your side borders first (like I generally do) and then add top and bottom borders - either way works very well.
Here's a great youtube.com video showing exactly what I'm talkin' about:


  • Use the feed dogs on your machine to ease out fullness in the quilt top or borders or both.  Generally speaking, I usually sew with my quilt top down next to the feed dogs of my sewing machine and my border strip on top while attaching it to the quilt top, applying just enough tension to the border strip to keep it taught while sewing - not so tight you could bounce a quarter off it, just taught enough to keep the edges from furling during the sewing application.  You will find if you consistently use this technique that your borders will stop 'waving at you' and you'll be the envy of your quilt guild with the straightest hanging quilts at the show!
  • Once your borders have been attached to your quilt top, ensure your quilt top is nice and square by measuring diagonally across the quilt top from each top corner edge across the center to it's opposite bottom corner edge.  Both these measurements should be roughly the same.  If the measurements are off alot, go back and repeat the first two steps which means you will need to do some un-picking, but it'll be worth it once your quilt top is ALL nice and square!

Quilting those Wavy/Uneven Borders

Pinning a wavy border in place prior to easing and basting down - a wonderful dressmaking technique
Again, first things first.  While consulting with your quilting client either in person, over the phone/fax or email, examine the quilt top thoroughly by spreading it out evenly on a large flat surface, preferably a table, but somewhere nice and flat so that you and your client can both examine the quilt top front & back together, (if at all possible, if not you may need to take a few pics and email or fax them to your client) and discuss any potential quilting issues that are evident or may arise, i.e., puckery or crossed or pulled seams, quilt top needs pressing, and wavy and/or uneven borders.  NOW is the time to discuss these issues prior to making any final quilting decisions, not after it's loaded onto the quilt frame for the longarm to quilt ;-)

If any issues are apparent, (like the ones pictured above/below), give your client the option FIRST to remedy the quilting situation by allowing them  to take their quilt top and address any potential issues that have become apparent - like re-stitching seams, pressing the top, or removing and re-attaching any uneven or wavy borders.
Another 'wavy' border pinned in place - plenty of fullness to ease in

Wavy borders eased in place and basted down ready for quilting
In most instances, the client will opt to address any quilt challenges themselves rather than risk a bad quilting outcome on their precious quilt heirloom, or incur any additional quilt top prep charges prior to loading on the longarm for quilting.  NOTE: Please see Quilt Top Preparation for further information regarding Quilt Top Prep Guidelines.  However, there will be situations that will arise when you will indeed be required to deal with wavy/uneven borders.  One particular instance involves charity quilts or quilts constructed by newbies, including children, among others.  For various reasons, the quilt top creator may not be known by the quilter (as in a donated quilt top) or the quilter may not have access to the creator, possibly due to the heirs of a quilt top wanting it to be quilted in honor of a passing relative or friend. In any event, the longarmer is now faced with wavy/uneven borders.  What to do, what to do?
  • Don't panic - wavy/uneven borders are practically a staple in the quilt world and the sooner a longarmer learns how to quilt out those wavy/uneven borders, the better. 
  • Do NOT stretch or pull the quilt top or borders excessively  trying to even everything out.  Easing 1" or less is optimal, anything more and alternate quilting techniques will need to be utilized. 
  • Learn the 'tricks of the longarming trade' quickly.  There are several quilting techniques and designs which can be utilized that will quilt out the fullness in a wavy border and will practically make those wavy/uneven borders seem straight as a string.   
    1. One of those tricks is stipple quilting or stippling for short.  Stippling eats up a lot of excess fabric making it almost undetectable to the naked eye.  I once quilted a vintage quilt top I inherited that was almost 12" longer from one side to the other - the creator had left out one whole 12" block on one side.  I solved most of the problem by stippling it out - here's a link to that story w/pics:  There Was A Crooked Quilt.. 
    2. McTavishing quilting is another wonderful quilting technique that will work very well in such a circumstance, and one of the primary reasons I came upon this quilting technique when I was faced with more than one charity quilt top that had fullness, not just in some of the borders, but in various parts of the quilt top itself and I didn't want to stipple everything again, so I went hunting for quilting alternatives.  McTavishing works much like stippling, and can even be combined with stippling and other quilting techniques to gobble up ALL that extra fabric fullness and even out a quilt top.  The more fullness in the challenging area, the denser the quilting technique needs to be.  Alternatively, quilt less densely in alternate areas and borders that may not have as much fullness to help keep everything balanced and even.
    3. Continue to experiment with new and vintage quilting design ideas and combine various techniques to bring a whole new aspect to your quilting challenges, keeping it FUN and interesting.  Professional quilt artist, Pam Clarke offers some wonderfully creative quilting innovations for solving those wavy/uneven borders.  Check out this youtube.com video for even more quilting ideas for those challenging borders for longarm beginners and veterans alike:  


  • Do Practice and Don't expect perfection right out of the shoot - Practice does indeed make better and better.  Doctors 'practice' their entire careers, why should you be any different?!
  • Last but not least - Don't forget to have FUN!  I like to make a game out of how well I can quilt out a challenging section in a quilt while applying a new technique or a combination of a mastered technique while incorporating a new one, and then reward myself with some chocolate either way ;-)
Good Luck with ALL your quilting ventures and drop me a line sometime and let me know how you're doin'...
~Deb

Tuesday, November 6, 2012

Sunday, November 4, 2012

Re: Hurricane Sandy Quilt Relief Project

Hey Everyone -

Just found out about this incredible quilt relief project for Hurricane Sandy victims being coordinated, once again by Luana Rubin of equilter.com  In addition to raising over $1 Million for various charities over the years, Luana w/equilter.com led quilt drives that delivered literally thousands of quilts to folks of 9/11, Katrina, Haiti and Japan tsunami survivors.

This time their goal is to donate 5,000 quilts to Hurricane Sandy victims.  If you would like to participate in any way, Please follow this link for all the details and most current updates pertaining to this project...Thank YOU!!

http://www.equilter.com/cgi-bin/webc.cgi/quiltrelief.html

UPDATE: November 5, 2012, Luana Rubin of equilter.com has just posted ALL the quilt relief guidelines AND the shipping address for any and all quilts that are to be donated to this Hurricane Sandy Quilt Relief Project at the above link.  Please read through these guidelines completely to ensure your quilt will arrive safely and be utilized by those most in need...Thank YOU for your interest and generosity!!

Betty Boop and I have signed up for three full size bed quilts and will start our work on them this week ;-).  I'll post more details and pics as progress ensues.

Our hearts and prayers go out to all the families and the survivors of this horrific storm.

My Best to You and Yours,
~Deb

UPDATE 11/26/2012:  Hurricane Sandy Quilt #1, The Good Morning Quilt
UPDATE   2/25/2013:  Hurricane Sandy Quilt #2, Renewal
UPDATE    3/11/2013:  Hurricane Sandy Quilt #3, Serenity

Thursday, November 1, 2012

Quilting the Quilt of Valor w/Updates


The Mission of the Quilts of Valor® Foundation:  "To cover Service Members and Veterans touched by war, with comforting and healing Quilts of Valor®".


Originally posted on November 1, 2012:

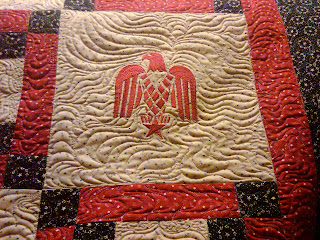
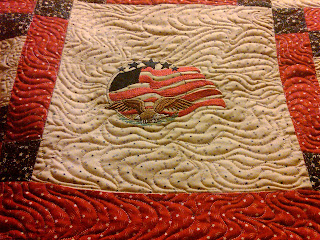
So...finally got up the courage to just go for it and quilt it out.  I knew I'd thought about quilting this Quilt of Valor quilt top far longer than I typically do, just didn't want to make any huge mistakes with this one.  And I think I succeeded on that front.  Here are a few of the quilted blocks and borders:


Utilized one of Sally Terry's 'Terry Twist' quilting motifs in each corner square instead of CCs and I think it suits this quilt better.

McTavish quilting utilized throughout each embroidery block and it's corresponding sashing


Lady Liberty is always one of my favorites


...coming off the frame...

I'm sooo thrilled at how well it turned out...Whew!  I was really nervous about quilting this one and really relieved to be binding it!  Still waiting for a QOV label to be delivered, and will finish up the carrying case tomorrow/later this afternoon.  I'll post an update when all is finished.

For now, I'm off for some shut-eye.

UPDATE September 3, 2014:  This Quilt of Valor was originally created with my WW II Veteran and dear father-in-law 'Dick' in mind.  Sadly, it was not completed until after his passing. This Quilt of Valor is now a 'Tribute Quilt' in honor of his life and his service and sacrifice for our country at Iwo Jima, as well as the life of my Uncle Danny - a Vietnam Veteran, and my cousin, IRAQ Veteran, Charles - who served and fell in IRAQ.  Dedication ceremonial plans are being finalized and will be included here when they are complete...Thank YOU!

Follow this link for Quilt of Valor II

Later,
~Deb


UPDATE 2014:
Miss Betty and I have been longarm quilting Quilts of Valor since 2010.  In 2012 we became official longam quilting Volunteers through the National Quilts of Valor Foundation longarm quilting service.  In 2014, several opportunities arose with Quilts of Valor, including starting the first Clark County 4-H Quilts of Valor Special Interest Group, establishing our East Central Illinois Quilts of Valor Group and accepting the position of East Central Illinois QOV State Coordinator.  Needless to say, it's been a busy and productive few years with Quilts of Valor, resulting in LOTS of QOVs for our deserving Service Members and Veterans.  

BIG Thank YOU goes to each and every one who helped make this possible for our East Central IL area Veterans and Service Members.

Questions?  Please contact: 

Deb Lindley/East Central Illinois QOV State Coordinator
Quilts of Valor® Foundation
217.264.2051 (Direct)
deb.lindley@QOVF.org
EastCentralILQOVGroupLeader@gmail.com  

"Covering our Service Members and Veterans touched by war with Quilts of Valor..."

The Quilts of Valor® Foundation is a non-profit established and operated in accordance with section 501(c)(3) of the Internal Revenue Code.

East Central Illinois QOV Blog:  http://eastcentralilqov.blogspot.com

Facebook: https://www.facebook.com/groups/EastCentralILQOV/ 


WW II Army Air Force Veterans - Thank YOU!

Help us cover our Service Members and Veterans with comforting and healing Quilts of Valor.  Tax-deductible Donations for our East Central IL QOV Group may be made online by following this Quilts of Valor link:


 www.QOVF.org
Please specify East Central IL QOV 
with your tax-deductible donation...Thank YOU!
For additional details on how you may help us cover our area East Central IL Service Members and Veterans, Please follow this direct weblink to our East Central IL QOV Blog...Thanks! 

Further details on our National QOV Sew Day:   Recent Events