Saturday, April 11, 2026

ALL Caught Up w/A Quilting Life Block of the Month!

It's been a minute or two since I've had time to post - what with holidays, winter storms that take out power and the net, then playing catch-up w/Spring Cleaning in the quilting studio and seed starting... barely had to catch my breath but... FINALLY catching up on the 'A Quilting Life Block of the Month'... and just lovin' these blocks!  

I chose a patriotic colorway from my stash for this mystery, to help Celebrate & Commemorate Our Country's 250th Anniversary!  

Here's my March block:

March block

Didn't this one turn out great?  And while the original directions are good, I really enjoy converting most quilt patterns via AccuQuiltable software - allowing me to take full advantage of my growing library of AccuQuilt dies!

This block lends itself nicely to the AccuQuilt GO! 12" cube.  Notice how the printable from the software states which cubes to use:

Which dies - including cubes


Then, the fabrics are listed - including die 'rough cuts' suggestions:

Fabric requirements

A nice pic of the finished block is also included in the rendering by AccuQuiltable Software:

Block rendering using my personal colorway choices

Because EVERY piece of this block is precision cut w/dies, assembly is a breeze and the back presses up so nicely - almost a pretty as the front!

Back of March block

The rest of my blocks from the 'A Quilting Life Block of the Month' have ALL been cut w/AccuQuilt dies - each and EVERY one turned out awesome!

Here's April:

I liked this block soooo much - I created it in two different sizes ;-)
Creating different sized blocks is a breeze w/AccuQuiltable software!

February:

February block while auditioning January fabrics


January:

January block


Now that I'm all caught up w/A Quilting Life Block of the Month - back to the quilting studio for more Spring Cleaning & Organizing!

Later,
~Deb


Tuesday, November 11, 2025

Patriotic Quilting for Our Vets

Squeezing in some last minute quilting for area Vets - this one a Patriotic 'Stripes' quilt:


Patriotic Stripes quilt - coming off the frame


This one was created from fabric strips of indigo denim and bandana red fabrics:

Indigo Blue/Bandana Red w/White strips


It went together fairly quickly, and comes from one of Moda's F R E E online quilt patterns that I adapted for the fabrics I had on hand.  Here's the video tut that includes this Moda strip pattern:

Moda 'Verticals' quilt pattern

Once assembled, it was FUN to quilt!

Quilting Close-up

w/'Let Freedom Ring' digital quilting design from Wasatch Quilting and Glide Silver - one of my fav combos ;-)

...more quilting close-ups


AI quilting at its best:

'Let Freedom Ring' E2E digital quilting design


Here's hoping EVERYONE had a very special Veteran's Day...especially our Beloved Vets!


Later,

~Deb

Monday, September 1, 2025

Bath Blocks - We have Bath Blocks for the Jane Austen 250th Anniversary BOM ;-)

Took me a few to get these finished up - NOT because they are difficult, by any means BUT...it's Fall and LOTS of things going on and to do!  In fact, might be a few more before I get to the Berkshire blocks - my quilting studio is in dire need of a good Fall cleaning/redo, and there's a Brand-NEW September Wallflower Mystery embroidery block to embroider...I'll keep you posted ;-)

Decided to use some fabrics from the Emily/Jane Riley Blake lines that hadn't previously been used in most of the blocks and, I'm glad I did!  They turned out neat & pretty, I do believe...

Bath block #1


Bath block #2


Applying cover stitches to this Bath block


I'm still utilizing the same methods I started with - using my ScanNCut to cut out ALL the applique shapes backed w/Steam-A-Seam2 OR Heat and Bond Lite - which actually works a bit better.  Place onto pressed/starched and creased Vintage White Confetti Cotton blocks, press into place and apply cover stitches.  This is possible, since I converted ALL the shapes to raw-edge applique - everything seems to be working out Great! 


Bath block #3


Bath block #4 - one of my favs


Since I'm using my own choice of fabrics, having LOTS of Fun choosing different ones for each block.  The Jane Austen 250th Anniversary Simple Shapes arrived and I was able to check my sizes - w/a bit of tweaking, they are lining up just fine.  I did discover that 'reducing' the original shapes by 15% 'after' re-sizing them to the given sizes in the Jane Austen 250th Anniversary pattern, rather than the original 10% reduction I started out with, gives a truer raw-edge applique size, it's a slight difference but, helps to fit the shapes easier on the blocks.  

Already have most of my fabric choices made for the London blocks - still making fabric decisions for the Berkshire blocks, I'll let those ideas marinate for a few while I work on my Fall chores.

Later,

~Deb

Monday, August 25, 2025

On to the Kent & Winchester Blocks of the Jane Austen 250th Anniversary BOM w/Updates

These blocks are turning out even more colorful...and interesting...

I refer to this block as my 'Happy' block - LOVE these vibrant colors!

'Happy' Winchester block


Using my choice of fabrics from the Riley Blake/Emma Jane line(s) - mostly from my stash of fat quarters, keeps this project FUN and Challenging - but so far, loving how things are starting to develop.

Winchester Navy/Red block getting its cover stitches


I decided to apply ALL the cover stitches to all the green stems followed by leaves of ALL the blocks first, followed by the different floral parts of each block - thus, things are moving along at a bit faster pace, than when I started this project - was that just last week? ;-)

Ready for cover stitch

Another sunshiny 'Happy' block getting it's cover stitching

Cover stitching moving along w/stems and leaves

Quite an interesting block, if I do say so.  Funny how things work out - I would have NEVER chosen these fabrics and the color combos for ANY quilt 'personally' BUT...they're growing on me.

Two of 4 blocks in the Kent grouping ready for cover stitches
(Thank Goodness for pics - just noticed how off-center two of these flower tops are...Oops!  
Those are now fixed ;-)

There are four (4) different blocks in each group - need to take a few more pics and will update this blog posting when I do...back to cover stitching those flowers.

Later,

~Deb

UPDATE 8/26/2025:  as Promised earlier - the following are the finished/stitched down Kent & Winchester blocks.  All that is left is to trim to size, planning on doing that prior to final assembly of the quilt.  Until then, ALL these blocks will be stored neatly/safely between cork felted design boards in a file folder box for easy retrieval and perusal ;-)  

Without further ado:


Kent blocks #1 - #4

Kent block #1


Kent block #2


Kent block #3


Kent block #4


Winchester Blocks #1 - #4:

Winchester block #1


Winchester block #2


Winchester block #3


Winchester block #4


Alrighty then -- just finished cutting out those Bath blocks...movin' on!


Thursday, August 21, 2025

Lovin' these Hampshire Blocks from The Jane Austen 250th Anniversary BOM!

 Lovin' these four (4) applique blocks - AMAZING!
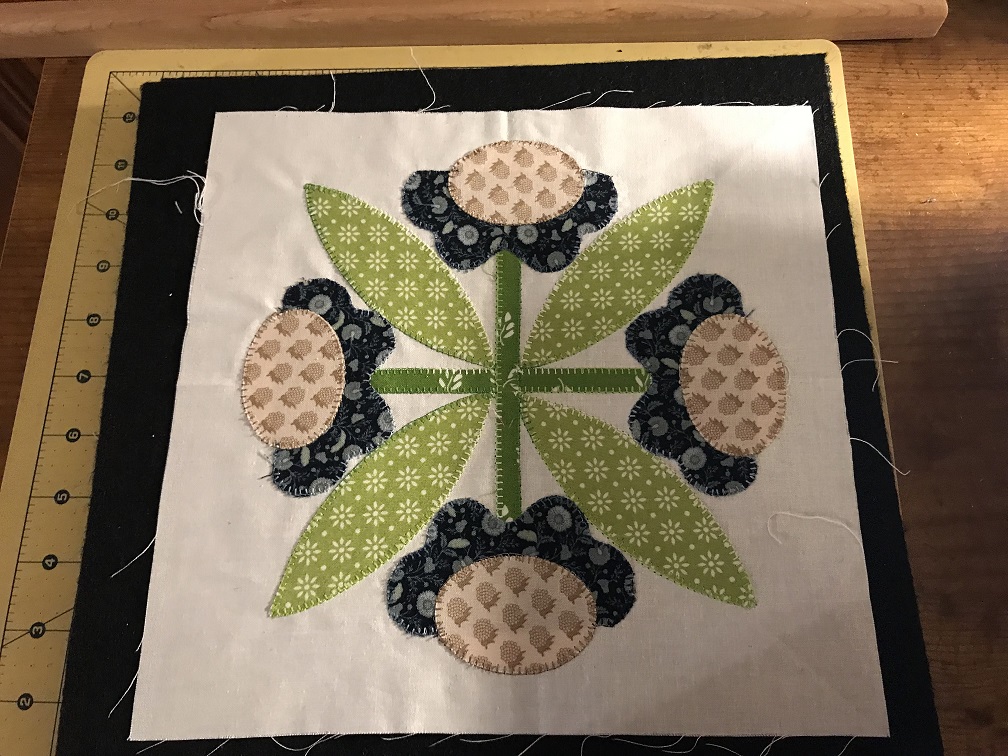

Hampshire Block #1


Hampshire Block #2


Hampshire Block #3


Hampshire Block #4


Having LOTS of FUN learning 'How To' cut w/ScanNCut - not quite a week ago today, I had NEVER cut one single/solitary thing w/ScanNCut!  Once I FINALLY got started - there's NO Stoppin' me now!  I even have two - an older one in the house:


and my Disney in the quilting studio.  As HOT as it's been in the MidWest lately, haven't wanted to go out and learn 'How To' run the Disney one that I got 'after' Christmas last year from a friend who won at a Christmas party at work and didn't want OR know what to do with...Thanks, Roxanne!  Recently, an older version - the 350cm came into my life for a song - Thanks, Veronica!  And now I get to have the best of BOTH worlds.

To create my applique templates to 'cut' my applique fabric shapes, I first needed to scan to print the original shapes in black & white, scan into my ScanNCut and then SAVE to my usb thumb drive (it could be done wirelessly IF one has wifi - my metal building where my quilting studfio resides allows NO wifi ;-):

Applique shapes - ready to print from pattern sheet


Once the units were scanned/SAVED, I imported ALL of them into Canvas Workspace and resized each and EVERY unit one at a time according to the sizes given in the original pattern, THEN 'after' each unit was sized properly, I reduced each unit 10% w/aspect ratio LOCKED to account for 'turn of cloth', since I was creating 'raw edge applique' pieces, rather than applique w/seam allowances.  (And I didn't figure this out until 'after' I had cut my first block - the Chawton block, and NONE of the pieces would fit...they were ALL too BIG.  I even had a sleepless night trying to figure this out when it hit me about 1:00 am...turn of cloth...BOOM!)

To prepare my fabric, I did what most of us do w/pressing:

Pressing fabric

Spraying Mary Ellen's on the BACK 'after' pressing:

My fav - Mary Ellen's Best Press

Pressing/steaming the front

I keep two (2) irons on my ironing board - one is STEAM,
the other is DRY - for dry pressing stabilizers like Steam-A-Seam

After pressing/starching ALL my fabrics and making sure they were DRY, it was time to stabilize w/Steam-A-Seam 2 Lite:

Steam-A-Seam2 Lite

I left the Steam-A-Seam2 Lite paper backing on 'until' it was time to load my mat(s) for cutting - I keep the backing for tear-away for machine embroidery AND for loading my freshly cut applique pieces 'until' ready to stitch-down w/cover stitch:

LOW tack mat loaded w/Steam-A-Seam2 Lite backed fabric - 
fabric side facing UP


LOW tack mat is key to part of my cutting success:


LOW tack cutting mat


Just look as these GORGEOUS cuts!

ALL perfectly cut!


It did take me more than a few cuts to realize I could turn my units 'sideways' 90 degrees to get the most cuts and use of my fabric but...once I did, I was off to the cutting races!


Sideways cutting - Gamechanger!


MULTIPLE units can be 'duplicated' w/press of a button on BOTH machines...BAM!  (I'm used to cutting w/AccuQuilt GO! cutter w/MULTIPLE layers of fabric - once I got used to duplicating units, since we can't use multiple layers of fabric on a ScanNCut...just made perfect sense.  And because I'm also used to cutting 'chunks' of fabric for my GO!, now I can cut 'chunks' for my ScanNCut...Oh, yeah, we got this ;-)


350cm ScanNCut - duplicating one unit in seconds


Brayer works great to ensure the fabric makes good contact w/mat and helps eliminate bubbles/creases:

Brayer works great to ensure good contact w/cutting mat and eliminate bubbles/creases


Getting ready to cut units for two (2) of the Hampshire blocks


The cuts are so precise, I can take advantage of scraps for stems, etc.

MAXING out scraps for 'stem' cutting - the Steam-A-Seam2 helps
the scraps stick to the mat for more efficient cutting...Who knew?


Freshly cut fabrics come off the cutting mat ready to be assembled into blocks and stitched down,

Stitching down Hampshire Block #1


Some of my chosen threads for this project - including multiple variegated threads:


Project threads - ALL are 40 wt. cotton


Already checking out those Kent blocks...I have some great ideas and fabrics for them ;-)


Later,

~Deb


PS.. Check out one of the previous posts on this Jane Austen 250th BOM here for additional info - including the F R E E pattern!  https://donebybettyboop.blogspot.com/2025/08/its-time-for-jane-austen-250th.html