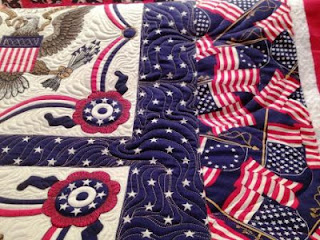
Halfway though quilting this Quilt Of Valor
SID and Outline quilting ALL the motifs in this block w/clear mono-poly
McTavish quilting in the background of each block
Sideways picture of the Flag borders quilted w/swags using HQ swag templates
All of the SID and outline quilting is finished along with the outside Flag borders. The interior star borders will be McTavish quilted w/Gold thread, the same Gold used to crosshatch in each of the navy borders of the banner and used to quilt a Gold Star in the circular navy/star motif above each eagle - after I finish the McTavish background fill in each of the eight Eagle blocks... just 4 more to go!
UPDATE 5/30/2013: Trying to finish up a quilting project in the MidWest with a continual onslaught of storms can be challenging, especially if one's studio is directly across the road from a flank of metal grain bins that just LOVE to draw lightning from every thunderstorm!
This is why my studio was wired with GFCIs from one end to the other, and I also use commercial grade surge protectors to plug my machines into, which then plugs into the wall mounted GFCI, but I STILL unplug all my machines whenever a storm arises - I'm not taking any chances!!
Managed to make some serious progress in between the rucus:
All the blocks and borders are now completely quilted, now to finish up the crosshatching and I'm golden ;-)
UPDATE 6/2/2013: This Quilt of Valor is now officially quilted and coming off my frame:
I Love how well it turned out - I'm always a bit surprised to see the finished quilt and how it quilts out...
A few stats on this QOV.
Threads:
Clear mono-poly - used to SID and outline quilt every motif in each block/border seams
LAVA Sandy Beach - used to McTavish background quilt each Eagle block
Penny Gold Glide - used to McTavish quilt the navy blue star sashing border
Rainbows Patriotic - used to quilt the 3-swag border in the outside flag borders
Bottom Line - used for all bobbin work, 18 hand-wound bobbins were required for this entire quilt
Batting:
Hobbs 80/20
After all trimming is complete, this Quilt of Valor quilt will be ready to ship back to it's creator - my QOV Team partner, who will finish binding the quilt, create the presentation case, gently launder and label prior to shipping it to it's final destination where it will be presented to a deserving Quilt of Valor recipient.
UPDATE 6/4/2013: shipped back to original creator and should arrive 6/7/2013.
I am truly honored to have participated in this wonderful project.
So, like I always say...time to get back to it...
Later,
~Deb


Oh! That's a stunning quilt! Great job by both of you.
ReplyDeleteThanks Miss Katie! I decided to pull out all the stops on this one - the only thing I didn't add, and came within a whisker of doing so, was feathers. If all the blue borders had been the same size, I would have, but since they weren't, went w/McTavishing, which fits just about anywhere ;-) It's been a great team effort...
ReplyDelete~Deb
This is beautiful! Since you have the same machine that I do and I am a rank beginner with it, I have to ask. When do you use precision and when do you use cruise modes? I reallly appreciate that you list the threads you use as well. Thanks!
ReplyDeleteHi Katy (2 Katys/Katies - I LOVE it!)and Thank YOU for your compliments, especially regarding this QOV ;-)
ReplyDeleteTo answer your question about the usage of the different stitch regulator modes on our HQ Avante machines - I use the Precision SR for ALL my ruler work and especially love it for McTavishing. The accuracy I get w/Precision is fantastic! Precision also works great for pantos. It takes a little bit to get used to, at least for me because my HQ16 didn't have this SR option, but once I got the hang of it, I absolutely LOVE Precision SR mode!
Cruise works for continual stitching like with stippling and quick background fills, and if you're fast with a design like freehand feathers but, if you need to hesitate with any design, then I think Precision works better because you don't have to worry about thread build-up in one place.
I do have to add, I usually switch to manual mode for most of my stippling in large areas, since that's how I originally learned with my 9" machine, which did not have an SR. Once I get into tight areas while stippling, I will switch to SR mode to help control my thread build-up.
Hope that helps, and Thanks again for stopping by!
~Deb
Very helpful info. Thanks!
ReplyDelete