Saturday, January 26, 2013

Easy Street Part VIII - coming along...

For some unknown reason, I really thought I'd be farther along w/Easy Street Part VIII than I am - but that's an aspect of the fantasy FUN, isn't it...?  I do have most of the Block A's almost finished, here's one of the needed 16 Block A's:

This is a stack of 12 Block A's - only 4 more left to piece!

If I hadn't spent almost as much time 'ripping' as I've spent 'piecing' these blocks, I'd probably already have them done!  I went through 5 sewing machines before I could find one that wouldn't scoot the seam allowances at the intersections, causing mis-alignment issues from one end of the block to the other, resulting in untold hours of ripping...YUK!  Finally, I dug my Juki 98e straight stitch machine out of storage - it was the ONLY machine that would sew over those intersections and keep everything all lined up nice and pretty w/virtually NO more shifting of seams and ultimate ripping...Yeah!


And I picked up a really neat pressing technique from Bonnie Hunter on page 2 in her instructions for Easy Street Mystery Quilt, Part VIII, and tweaked it for this block which helped sooo much in getting most of the intersected seams to 'stagger' with one caveat - I pressed 'open' ALL the double brick seams via Bonnie, which gave me some relief when getting all of those seams to lay nice and flat.  Here's part of one of the backs of a Block A w/pressing option - notice the double brick seams pressed 'open':


And the rest of the back
And the entire pressed Block A:                

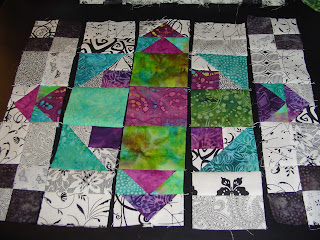
 The front of Block A partially pieced, ready for the final 'strip piecing' assembly:

And now, time to get back to piecing the final 4 Block A's so I can move on to those 9 block B's - you know what I'm doin' w/my weekend, in between coughing and blowing, don't you? (YES, I STILL have remnants of this blamed flu - talk about hangin' on, Geez!).

Later,
~Deb

Wednesday, January 16, 2013

Looky-look what I got in the mail...

Just look what I found in my mailbox - can anyone say 'Too CUTE?!'


 There are a total of 8 of these adorable appliqued critters ;-)

or 'Totally AWESOME?!'
 8 embroidered AWESOME horse blocks 
w/coordinating horse fabric pieced blocks!

Those creative ladies over at Quilters for Comfort (QFC), continually amaze me with their talent, and especially their generosity, and the wonderful lady who sent these to me, Nancy H. of QFC, is no exception.

I mean seriously, would you spend all the time it takes to embroider and applique 16 large quilt blocks, piece together the corresponding filler blocks AND send/contribute matching fabrics too boot, All to be stitched together into tops and quilted so the final quilts can be donated to some lucky child/person?

I know many of you do and I commend you and Thank YOU for your tireless efforts - they are much more appreciated than you'll ever know.  For me personally, the rewards are limitless.

Speaking of which, time for me to get busy.  I need to finish up two in-the-works projects before I can even think about piecing these adorable quilt tops together, including Easy Street, which is coming together nicely, pics will be up soon - hopefully by the weekend so I can get started on these neat tops.  And I'm more than anxious to do just that 'cause my head is whirling away with ideas of how these 2 tops can come together and then the FUN/quilting begins...YES!

Sooo....like I always say...time to get back to it...
~Deb

PS...I almost forgot...Thank YOU, Nancy H. of QFC ;-)

PSS...Check out 'Putting QFC Quilt Tops Together for Missouri Boys Home...' to see how these blocks came together in their quilts ;-)

Sunday, January 13, 2013

Finishing Up Part VII of Easy Street

Got some extra sewing time w/ice storm coming in, so decided to get productive and work on Bonnie Hunter's Easy Street Mystery Quilt - Part VII to be exact ;-)

First of 12 pieced #2 triangles

         Pressed and pruned back of #1 pieced triangle

Two of the 4 pieced #1 triangles 
(I got the other two finished up after pics)

Chain piecing the triangles                       

It occurred to me this would make a great leaders and enders piecing project soooo...., quickly cut a few more of those cheddar bow ties I've had in storage for the past couple of months and got busy piecing those while piecing each row of the triangle blocks - got quite a few pieced too ;-)

Leaders & Enders piecing my cheddar bow ties w/triangle blocks

              This is what got finished just today...

and what I have to date - so far there are over 400+ bow ties in this 5 qt. ice cream bucket,
more than half-way to my final goal of 750, looks like I'm going to need another bucket soon ;-)

UPDATE January 14, 2013:  Completed 9 of the 12 #2 triangles so far and should finish up the rest this evening.  I'll post pics prior to moving on to Easy Street Part VIII:

And here they ALL are - (4) #1 corner triangles AND
(12) #2 perimeter triangles

Did you just see what I just saw?  Where's all my critical-eye folks/quilters??  While admiring this pic for like, I don't know, at least the 10th time, I just noticed something.  Check out the lower third triangle, left side - one of the foursies is turned wrong, I know because I see a white-on-black 1 1/2" square peaking out where a charcoal grey should be! Aaarrgh!!  And I checked these triangles multiple times while pressing and pruning, prior to taking pics and posting, and patted myself on the back when I read of others having to rip...not me, I said to myself, I checked, double-checked, and triple-checked!!!

Well, there's nothin' left to say or write, time to rip and re-stitch and join my fellow Easy Street-ers who've already done the same, looks like I'm in very fine company. ;-)

And now, time to get back to it!

Later,
~Deb
PS...Don't forget to check out ALL the Easy Street Mystery Quilt participants, their gorgeous fabric choices and progress here:

Wednesday, January 9, 2013

Easy Street Part VI DONE...

OK, playing catch-up w/Easy Street Mystery Quilt.  Just finished up with Part VI:

(128+) 3 1/2" double bricks all stacked up in pretty little rows ;-)

Sewing the 2" strips together, getting ready to cut into 3 1/2" double bricks

Cutting the 3 1/2" double bricks

Extra Credit - (16) 5 1/2" green squares cut into (4) quarter square triangles

And all 64 quarter square triangles are ready to go!

And now, on to Part VII - I'll catch up w/you later...
~Deb

Monday, January 7, 2013

Jungle Elephant Quilt DONE!

Well good grief, Charlie Brown!  Not only did I think I would NEVER get this quilt pieced and on the frame, I was beginning to think I would NEVER get it quilted and bound - WHEW!  Finally, I can FINALLY say I finished this Big Boy:


I know I'm including ALOT of photo downloading time, but I thought you might enjoy the close-ups of quilting and application techniques, since the long-shot photos don't due the fabrics and threads justice - they are just gorgeous!  (Complete info on threads, etc., on another earlier post HERE - and I caution you, that post is even heavier w/photos.)


Turned out pretty good if I say so myself ;-)  I LOVED working on this quilt, too - it was an evolutionary-type quilt as it didn't start out with any kind of pattern, just some elephant embroidery blocks, some vibrant colored hand-dyed batik fabrics and some, thank goodness, much needed inspiration!  

I had a ball quilting it, primarily with my favorite type of quilting, McTavishing and again, I think it gave this quilt additional movement and character that enhanced the batiks and the embroidery quite nicely.

Binding this dude was a little challenging:

Thank heaven for little card table...

Blind hemming the binding w/clear monopoly


The clear/invisible monopoly thread is such a life-saver w/multiple fabric colored binding, as with this quilt, and is virtually undetectable when applied in this fashion.  I cannot however, take the credit for this amazing technique.  

As with many, if not most of my quilting/sewing ideas, this one has been permanently 'borrowed' from professional quilt artist, Leah Day:
Part I

Part II

These videos are a little long, but if you are in need of learning how to apply quilt binding completely by machine, then these are for you and well worth your time.  I use this technique on ALL my gift/charitable projects because it's FAST and stands up to repeated laundering - a Win/Win in my book.  I've used all kinds of threads to apply, but my favorites are clear/invisible monopoly and matching embroidery/quilting threads from my quilt.  

When I use clear monopoly and/or embroidery thread, I follow it up w/pre-wound polyester bobbins (the same kind I use in my embroidery machine will fit in the machine I apply my bindings with, both are Vikings, so I have these bobbins in bulk and on hand most of the time, and another time-saver for me ;-)

Alrighty then, just need the quilt label finished up and I'm golden.  But for now, I'm off for some shut-eye so I can get rested up and try to get caught up with Bonnine Hunter's annual Mystery quilt, Easy Street, 'cause the Monday Morning 'linky' is in a few short hours!

Later,
~Deb

PS...
For the complete Jungle Elephant story, you can go to the original post w/updates here: